Normally when we try to return a response from a controller, we return the response as it is. But sometimes we need to format the response before sending it to the client. For example, we may need to add some metadata to the response, or we may need to modify the response structure.
Example if we are trying to retrieve the user details from the database, the response will be like this:
Controller :
users.controller.ts
  @Get(':id')
  @ApiOperation({
    summary: 'Get user by id',
    description: 'Get user data by id',
  })
  async getUserById(@Param('id') id: string) {
    return await this.userService.getUserById(id);
  }
The above code will return the response like this:
 {
    "id": "2af04f53-d85a-4135-a5b3-ee8bfd150fbb",
    "email": "user@gmail.com",
    "password": "$2a$10$pi9qWbtwMp9yDryrshClN.crw0ZvyTNuk5.z2n1E10p0uCdxwsMZO",
    "role": "Client",
    "createdAt": "2024-04-28T07:29:55.450Z",
    "updatedAt": "2024-04-28T07:29:55.450Z",
 }
It will be better if we can convert above response in more structured way:
{
    "status": true,
    "path": "/api/v1/users/2af04f53-d85a-4135-a5b3-ee8bfd150fbb",
    "message": "success",
    "statusCode": 200,
    "data": {
        "id": "2af04f53-d85a-4135-a5b3-ee8bfd150fbb",
        "email": "user@gmail.com",
        "password": "$2a$10$pi9qWbtwMp9yDryrshClN.crw0ZvyTNuk5.z2n1E10p0uCdxwsMZO",
        "role": "Client",
        "createdAt": "2024-04-28T07:29:55.450Z",
        "updatedAt": "2024-04-28T07:29:55.450Z",
    },
    "timestamp": "2024-04-28 17:50:37"
}
The above response is more structured and contains metadata like status, path, message, statusCode, and timestamp. This is more readable and informative than the previous response.
Format Nest.js Response using Interceptors
It will be very cumbersome to format the response in every controller. It will be better if we can create a function that will format the response and we can use that function in every controller.
In Nest.js, Interceptors are used to intercept the request and response lifecycle. They are used to modify the request and response objects.
Image from: Nest.js Docs
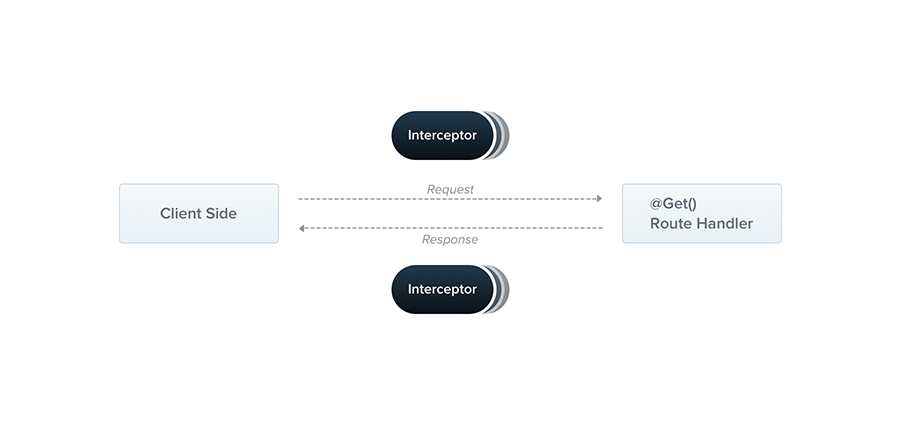
Interceptors Lifecycle in Nest.js
Let's create an interceptor that will format the response.
response.interceptor.ts
import {
  Injectable,
  NestInterceptor,
  ExecutionContext,
  CallHandler,
  HttpException,
  HttpStatus,
} from '@nestjs/common';
import { Observable, throwError } from 'rxjs';
import { catchError, map } from 'rxjs/operators';
import { format } from 'date-fns';

export type Response<T> = {
  status: boolean;
  statusCode: number;
  path: string;
  message: string;
  data: T;
  timestamp: string;
};

@Injectable()
export class ResponseInterceptor<T> implements NestInterceptor<T, Response<T>> {

  intercept(
    context: ExecutionContext,
    next: CallHandler,
  ): Observable<Response<T>> {
    return next.handle().pipe(
      map((res: unknown) => this.responseHandler(res, context)),
      catchError((err: HttpException) =>
        throwError(() => this.errorHandler(err, context)),
      ),
    );
  }

  errorHandler(exception: HttpException, context: ExecutionContext) {
    const ctx = context.switchToHttp();
    const response = ctx.getResponse();
    const request = ctx.getRequest();

    const status =
      exception instanceof HttpException
        ? exception.getStatus()
        : HttpStatus.INTERNAL_SERVER_ERROR;

    response.status(status).json({
      status: false,
      statusCode: status,
      path: request.url,
      message: exception.message,
      result: exception,
      timestamp: format(new Date().toISOString(), 'yyyy-MM-dd HH:mm:ss'),
    });
  }

  responseHandler(res: any, context: ExecutionContext) {
    const ctx = context.switchToHttp();
    const response = ctx.getResponse();
    const request = ctx.getRequest();
    const statusCode = response.statusCode;


    return {
      status: true,
      path: request.url,
      statusCode,
      data: res,
      timestamp: format(new Date().toISOString(), 'yyyy-MM-dd HH:mm:ss'),
    };
  }
}
In the above code we have defined the shape of the response object using the Response type. The Response type contains the status, statusCode, path, message, data, and timestamp fields.
The intercept method might look a bit complex, but it is very simple. The inetercept method as access to context and next.
- The
contextobject contains the request and response objects. - The
nextobject contains the next handler in the chain. - The
next.handle()method is used to call the next handler in the chain. - The
pipemethod is used to chain multiple operators. - Then it maps each response object to the
responseHandlermethod and each error object to theerrorHandlermethod.
The responseHandler formats the response object and the errorHandler formats the error object.(logic inside it is self explanatory).
Another awesome thing about interceptors is that we can configure it on a global level or on a per-controller level. Since we are going to use the same interceptor for every controller, we will configure it on a global level.
To make it global, we need to add the interceptor to the main.ts file.
app.module.ts
import { ResponseInterceptor } from './response.interceptor';

async function bootstrap() {
    // other code
        app.useGlobalInterceptors(new TransformInterceptor());
    // other code
}
Now this will format the response for every controller without adding the interceptor to every controller.
Let's try to hit the same endpoint :
{
    "status": true,
    "path": "/api/v1/users/2af04f53-d85a-4135-a5b3-ee8bfd150fbb",
    "message": "success",
    "statusCode": 200,
    "data": {
        "id": "2af04f53-d85a-4135-a5b3-ee8bfd150fbb",
        "email": "email@gmail.com",
        "password": "$2a$10$pi9qWbtwMp9yDryrshClN.crw0ZvyTNuk5.z2n1E10p0uCdxwsMZO",
        "role": "Client",
        "createdAt": "2024-04-28T07:29:55.450Z",
        "updatedAt": "2024-04-28T07:29:55.450Z",
    },
    "timestamp": "2024-04-28 17:50:37"
}
Passing Custom Message from Controller to Interceptor
I want to enhance above interceptor a bit by passing the custom message from each controller to the interceptor. I fyou notice above error handler produces the error message from execption.message, but there is no way to pass custom message from controller to interceptor for success response.
Let's enhance the interceptor to accept the custom message from controller.
For that we need to first create decorator to pass the custom message from controller to interceptor.
response-message.decorator.ts
import { SetMetadata } from '@nestjs/common';

export const RESPONSE_MESSAGE_METADATA = 'responseMessage';

export const ResponseMessage = (message: string) =>
  SetMetadata(RESPONSE_MESSAGE_METADATA, message);
Create a decorator ResponseMessage which accepts the message and sets the metadata responseMessage with the message.
Now we need to modify the interceptor to read the metadata and pass the message to the response object. Here's final code for the interceptor.
response.interceptor.ts
import {
  Injectable,
  NestInterceptor,
  ExecutionContext,
  CallHandler,
  HttpException,
  HttpStatus,
} from '@nestjs/common';
import { Observable, throwError } from 'rxjs';
import { catchError, map } from 'rxjs/operators';
import { format } from 'date-fns';
import { Reflector } from '@nestjs/core';
import { RESPONSE_MESSAGE_METADATA } from './response-message.decorator';

export type Response<T> = {
  status: boolean;
  statusCode: number;
  path: string;
  message: string;
  data: T;
  timestamp: string;
};

@Injectable()
export class ResponseInterceptor<T> implements NestInterceptor<T, Response<T>> {
  constructor(private reflector: Reflector) {}

  intercept(
    context: ExecutionContext,
    next: CallHandler,
  ): Observable<Response<T>> {
    return next.handle().pipe(
      map((res: unknown) => this.responseHandler(res, context)),
      catchError((err: HttpException) =>
        throwError(() => this.errorHandler(err, context)),
      ),
    );
  }

  errorHandler(exception: HttpException, context: ExecutionContext) {
    const ctx = context.switchToHttp();
    const response = ctx.getResponse();
    const request = ctx.getRequest();

    const status =
      exception instanceof HttpException
        ? exception.getStatus()
        : HttpStatus.INTERNAL_SERVER_ERROR;

    response.status(status).json({
      status: false,
      statusCode: status,
      path: request.url,
      message: exception.message,
      result: exception,
      timestamp: format(new Date().toISOString(), 'yyyy-MM-dd HH:mm:ss'),
    });
  }

  responseHandler(res: any, context: ExecutionContext) {
    const ctx = context.switchToHttp();
    const response = ctx.getResponse();
    const request = ctx.getRequest();
    const statusCode = response.statusCode;
    const message =
      this.reflector.get<string>(
        RESPONSE_MESSAGE_METADATA,
        context.getHandler(),
      ) || 'success';

    return {
      status: true,
      path: request.url,
      message: message,
      statusCode,
      data: res,
      timestamp: format(new Date().toISOString(), 'yyyy-MM-dd HH:mm:ss'),
    };
  }
}
The above code is similar to the previous code, but we have added the Reflector class to read the metadata. Now the message is read from teh reflector by passing the key and context and finally message is mapped to the response object.
Now we can use the ResponseMessage decorator to pass the custom message from the controller to the interceptor.
  @Get(':id')
  @ApiOperation({
    summary: 'Get user by id',
    description: 'Get user data by id',
  })
  @ResponseMessage('User data fetched successfully')
  async getUserById(@Param('id') id: string) {
    return await this.userService.getUserById(id);
  }
Now the message User data fetched successfully will be passed to the interceptor and the response will contain the custom message. The final response will be like this:
{
    "status": true,
    "path": "/api/v1/users/2af04f53-d85a-4135-a5b3-ee8bfd150fbb",
    "message": "User data fetched successfully",
    "statusCode": 200,
    "data": {
        "id": "2af04f53-d85a-4135-a5b3-ee8bfd150fbb",
        "email":  "user@gmail.com",
        "password": "$2a$10$pi9qWbtwMp9yDryrshClN.crw0ZvyTNuk5.z2n1E10p0uCdxwsMZO",
        "role": "Client",
        "createdAt": "2024-04-28T07:29:55.450Z",
        "updatedAt": "2024-04-28T07:29:55.450Z",
    },
    "timestamp": "2024-04-28 17:50:37"
}
This is how we can format the response in Nest.js using Interceptors. Interceptors are very powerful and can be used to modify the request and response objects. They are very useful when we need to format the response or add some metadata to the response.
One thing you have realized it we are exposing password in the response. It is not good practice to expose the password in the response. It will be better if we can filter out the password field from the response.
{
    "status": true,
    "path": "/api/v1/users/2af04f53-d85a-4135-a5b3-ee8bfd150fbb",
    "message": "User data fetched successfully",
    "statusCode": 200,
    "data": {
        "id": "2af04f53-d85a-4135-a5b3-ee8bfd150fbb",
        "email": "user@gmail.com",
        "role": "Client",
        "createdAt": "2024-04-28T07:29:55.450Z",
        "updatedAt": "2024-04-28T07:29:55.450Z",
    },
    "timestamp": "2024-04-28 17:50:37"
}
We will learn how to filter out the fields from the response and make response dto using awesome library called class-transformer using Interceptors in the next article.
That's all for this article. If you have any questions or feedback, feel free to reach out to me on Twitter or comment below. I am always happy to help.
Happy coding! 🚀🚀